Most follow-along workouts are filmed for one level.
That works for the people who match that level. Everyone else has a problem.
A beginner hits a burpee they can't do, stops, and leaves. An experienced viewer finishes the workout feeling like it was too easy, and doesn't come back for the next one.
Adding follow-along workout variations fixes both. You show an easier and a harder version of each move, so more people can finish the video and feel it was made for them.
It's also a big gap. When we reviewed 32 popular follow-along videos for our follow-along retention teardown, only 12 of the 21 coached videos offered an easier option out loud, by our count.
This guide covers:
- Three ways to show beginner and advanced versions in a video.
- A simple ladder for building an easier and a harder version of any exercise.
- How to film all of it in one session.
- How to turn that one session into three separate videos, one per level, without editing three times.
Why beginner and advanced variations matter
There are three reasons.
1. People search by level
Viewers don't just search "full body workout". They add their level.
When we checked in October 2026, typing "beginner workout" into YouTube search suggested "at home", "no equipment" and "with dumbbells". Type "low impact workout" and it suggested "for beginners" and "standing". Type "advanced hiit" and it suggested "workout no equipment" and "no jumping".
Type "workout with modifications" and it suggested "hiit workout with modifications" and "full body workout with modifications".
These suggestions show what people are typing. They don't show exact search numbers. But they make one thing clear: the level is part of the search.
A video that says "beginner" or "advanced" in the title matches those searches word for word. A video without the level in its title gives up that match.
2. Too hard is a reason to stop
The CDC advises people to pick activities that match their abilities so they stick with them. The NHS says the intensity should be appropriate for your fitness.
Research points the same way. A review of 33 research papers found that pleasure during exercise drops mainly above a certain intensity. It also found that when people choose their own intensity, they handle harder work better.
That research is about effort, not about videos. But the lesson carries over. Giving viewers a choice of level may help more of them stay in the workout.
Group fitness brands already build this in. Les Mills says its BODYATTACK class has low-impact options so people can choose the intensity.
3. Advanced viewers need somewhere to go
For strength training, the American College of Sports Medicine describes three levels: novice, intermediate (about six months of steady training) and advanced (years of training).
It recommends different loads and training frequency for each level. If your channel only has one level, your viewers outgrow it.
In plain English:
Beginners need a way in. Advanced viewers need a way up. Variations give them both.
How to show modifications in a follow-along workout: 3 ways
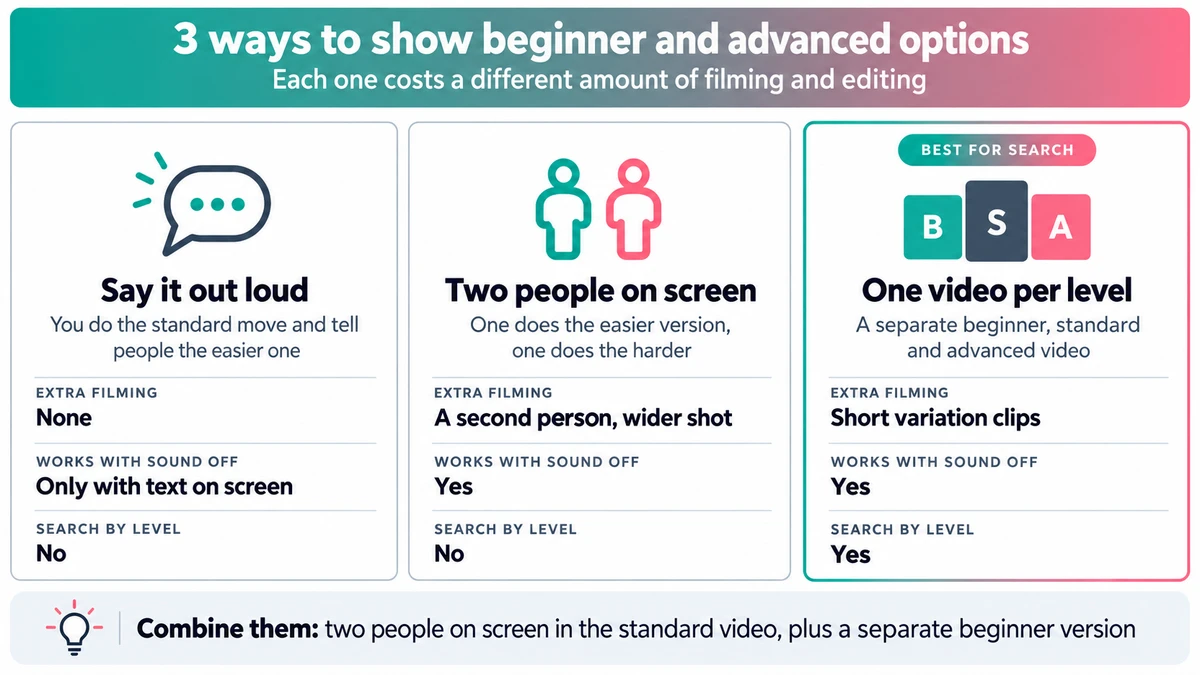
There's no single right way. Each option costs a different amount of filming and editing time.
Option 1: Say it out loud
You do the standard version and tell people the easier one.
"If jumping is too much, step back instead."
This is the cheapest option. It takes no extra filming.
The downside is that a spoken tip doesn't reach anyone watching with the sound off. It also doesn't help a beginner who doesn't know what "step back" looks like.
If you do this, add the easier version as text on screen too.
Option 2: Two people on screen
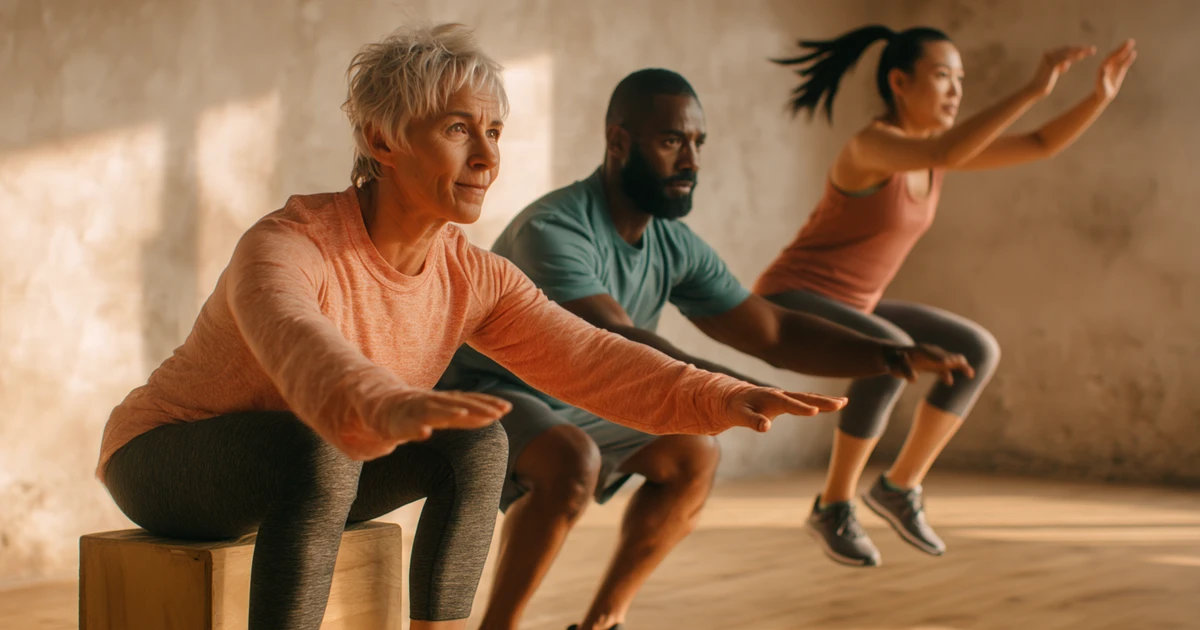
One person does the easier version. The other does the harder one, at the same time.
When Apple Fitness+ launched in 2020, Apple said every workout includes a trainer demonstrating modifications. On YouTube, Juice & Toya use the same idea in some of their videos: Toya does the modified version while Juice goes all out.
Viewers can see their version at all times.
It needs a second person and a wider shot. It also means one video serves several levels, so the title can't say "beginner" or "advanced".
Option 3: A separate video for each level
You publish a beginner video, a standard video and an advanced video of the same workout.
Some creators separate levels this way. Caroline Girvan, for example, lists an Ultimate Beginner program ("If you have never trained, this is where you begin") separately from strength programs like IRON.
This is the strongest option for search, because each video can put its level in the title.
It used to be the most expensive option, because it meant three edits. The rest of this guide shows how to do it from one filming session.
| Say it out loud | Two people on screen | One video per level | |
|---|---|---|---|
| Extra filming | None | A second person, wider shot | Short variation clips |
| Extra editing | A few text labels | Very little | Two more videos |
| Works with sound off | Only with text on screen | Yes | Yes |
| Search by level | No | No | Yes |
| Best for | Quick wins on existing videos | Mixed-level audiences | Growing a channel by level |
You can also combine them. A standard video with two people on screen and a separate beginner version is a strong setup.
The variation ladder: an easier and a harder version of any exercise
Before you film, plan the versions.
Trainers call the easier version a regression and the harder one a progression. The American Council on Exercise describes progressions as stepping-stones. Walk the steps backwards and you get the regressions.
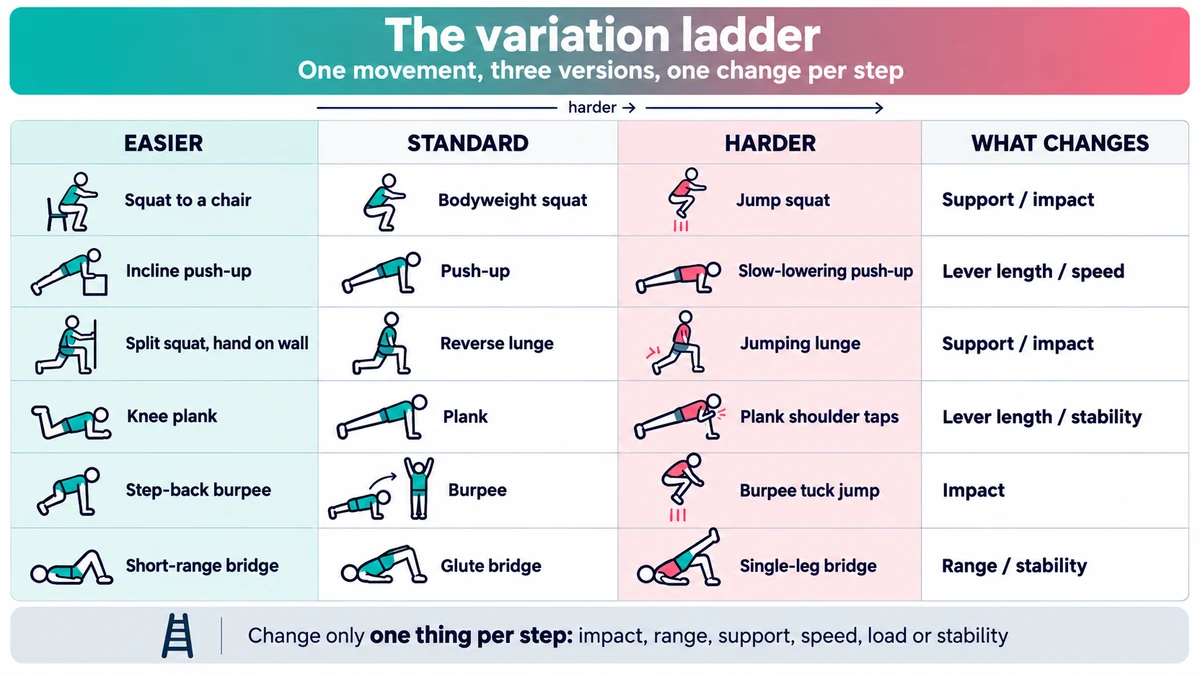
For a follow-along video, three steps are enough:
- Easier (beginner)
- Standard
- Harder (advanced)
Change one thing at a time
Each step should change only one thing about the move. Here are the things you can change:
- Impact: step instead of jump.
- Range of motion: go less deep, or deeper.
- Lever length: knees down instead of a full plank.
- Support: use a chair or wall, or remove it.
- Speed: slow the lowering part down to make it harder.
- Load: add or remove a dumbbell.
- Stability: two feet, then a split stance, then one leg.
Keeping the same basic movement matters. If the beginner is squatting while the advanced viewer is squatting too, everyone stays in the same workout and the same timer.
Example ladders
| Standard | Easier | Harder | What changes |
|---|---|---|---|
| Bodyweight squat | Squat to a chair | Jump squat | Support / impact |
| Push-up | Incline push-up on a bench | Slow-lowering push-up (3 sec down) | Lever length / speed |
| Reverse lunge | Split squat, hand on a wall | Jumping lunge | Support / impact |
| Plank | Knee plank | Plank with shoulder taps | Lever length / stability |
| Burpee | Step-back burpee, no jump | Burpee with tuck jump | Impact |
| Glute bridge | Short-range bridge | Single-leg bridge | Range / stability |
These are examples, not rules. Pick versions that suit your audience and your style.
Change the timing too
Levels aren't only about the move. You can also change how long people work and rest.
| Work | Rest | Rounds | |
|---|---|---|---|
| Beginner | 30 sec | 30 sec | 2 |
| Standard | 40 sec | 20 sec | 3 |
| Advanced | 45 sec | 15 sec | 3–4 |
These numbers are an example of how to set the levels apart, not a standard. They are not medical advice, and the right level is different for everyone.
Fitness Blender's beginner guidance is a good model for how to say this to viewers: start with a few reps and one set until you know how your body reacts.
So the simple rule is:
One movement, three versions, one change per step. Then adjust work and rest for each level.
How to film all three levels in one session
You don't need three shoots. You need one well-planned one.
If you have a second person
Film both people side by side in a wide 16:9 shot.
- Keep the easier version on one side and the harder version on the other, every time.
- Leave space around both people so floor exercises don't get cut off.
- Record the full workout in one take, just like normal.
From this one recording, you can publish the two-person video. You can also crop each person out later to make single-level videos and short clips.
If you're filming alone
Film the standard workout in full first.
Then, without changing your setup, film a short clip of each variation:
- the easier version of every exercise
- the harder version of every exercise
Make each clip as long as the work interval you plan to use in that level. If the beginner level uses 30-second intervals, film at least 30 seconds of each easier move.
Keep the same clothes, lighting and camera position. That way the clips cut together cleanly.
Say the name before every clip
Start each variation clip by saying what it is: "Squat. Easier version."
It takes two seconds. It makes the clips much easier to find later, for you or for any editing tool.
Frame for the crop
You'll probably cut short vertical clips from this footage too. Keep yourself near the center and leave room around you. Our guide to workout video formats and safe zones explains how standing and floor exercises crop differently.
A one-session shot list
- Full standard workout, one take, wide 16:9
- Easier version of each exercise, one clip each
- Harder version of each exercise, one clip each
- A short intro for each level ("This is the beginner version")
- Each clip starts with the exercise name and level, said out loud
How to edit three videos without editing three times
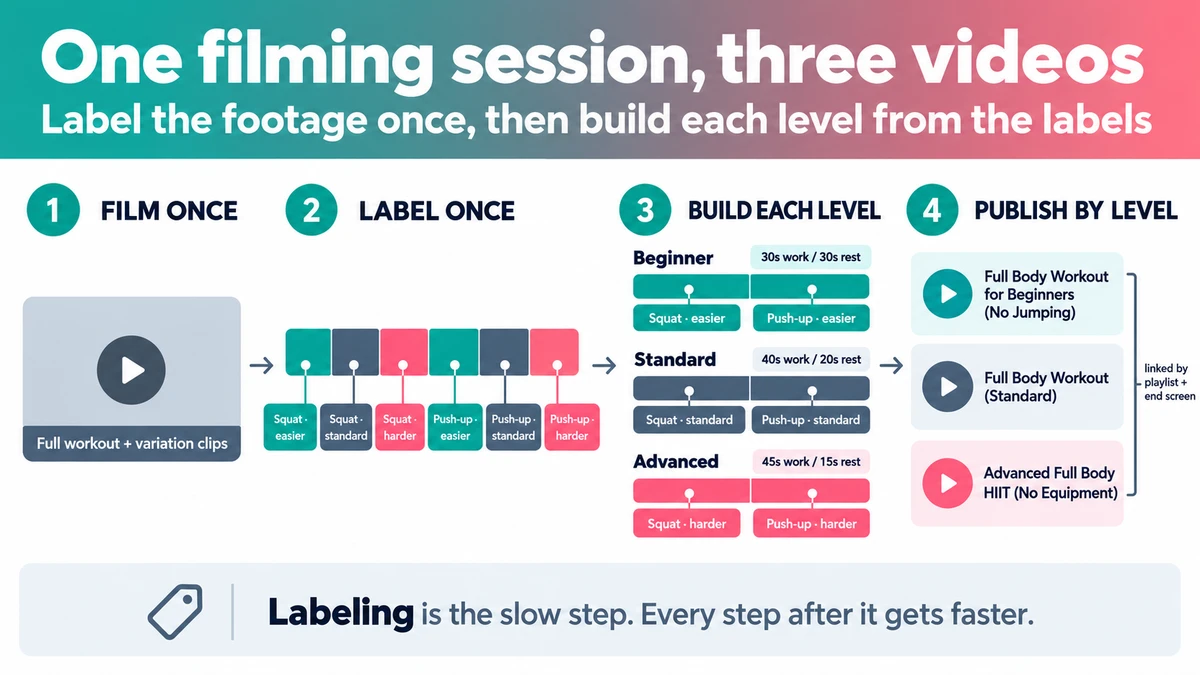
Label everything once. Then build each video from the labels.
Step 1: Label every segment
Go through the recording once and mark each exercise with its name and level:
- "Squat · standard"
- "Squat · easier"
- "Squat · harder"
This is the slowest step. Every step after it gets faster because of it.
Step 2: Build each level from the labels
Each video uses the same structure. Only the clips and the timing change.
- Beginner video: the easier clips, longer rest, fewer rounds.
- Standard video: your full workout, as filmed.
- Advanced video: the harder clips, shorter rest, more rounds.
Step 3: Make the level obvious on screen
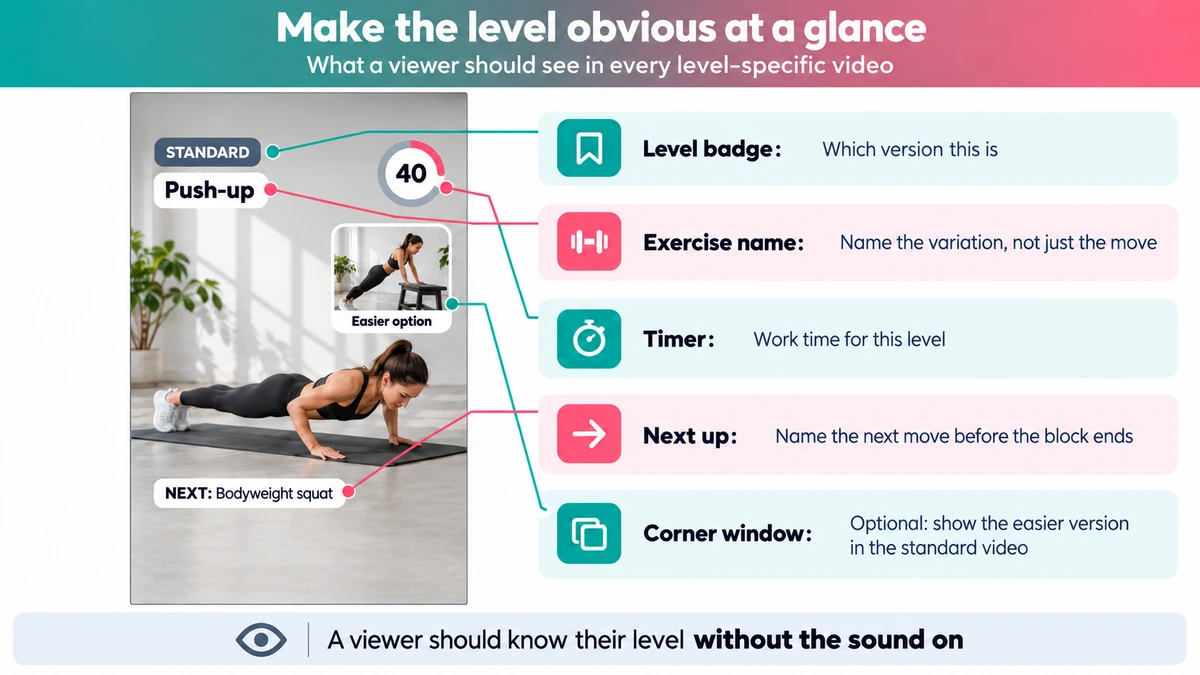
A viewer should know which version they're watching at a glance:
- the level in the corner ("BEGINNER")
- the exercise name with the variation ("Incline push-up")
- the timer
- a preview of the next exercise
In the standard video, you can also show the easier version in a small window in the corner. Viewers who need it can follow that instead.
Step 4: Title and link them by level
Give each video a title that matches what people search:
- "20 Min Full Body Workout for Beginners (No Jumping)"
- "20 Min Full Body Workout (Standard)"
- "20 Min Advanced Full Body HIIT (No Equipment)"
Then connect them:
- Put them in playlists by level.
- Link the other two levels in each description.
- Add an end screen that sends people to the next level up.
That last one matters. When a beginner is ready to move on, you want them to find your next video, not someone else's.
Step 5: Cut Shorts from the ladder
The variation clips also make good short videos.
One idea: show the same exercise at all three levels, back to back. "Can't do a push-up yet? Start here." It's useful, it's easy to save, and it points people to the full workout. Our guide to turning workout videos into Reels covers the rest of the short-form process.
Doing it at scale with AI: an ActiveSnap walkthrough
Disclosure: ActiveSnap makes the tool described in this section. Everything above works with any editor.
Labeling segments, building three timelines and adding the same overlays three times is repetitive work. It's the kind of job ActiveSnap is built for. Here's how the workflow above looks inside it.
1. Upload once, get the exercises found for you
Upload the full recording, standard workout and variation clips, to Original Videos. ActiveSnap detects the exercises in the footage and marks each one on a timeline as an Exercise Event.
2. Add the level to each label
Open the Original Video Events Timeline Editor to review what was found. Fix anything that's wrong, and rename each event with its level: "Push-up · easier", "Push-up · harder".
Detection finds and names the exercise. You decide which version counts as beginner or advanced. This review is the step from "Label every segment" above, done on a timeline that's already marked up.
3. Make one project per level
In the Projects Studio, create a project for the beginner video from the same Original Video. Then another for the advanced video. Each one starts from the same footage, so nothing is uploaded or filmed twice.
Your Brands profile carries your colors, fonts and logo into every project, and the intro and outro templates fill themselves in from it. All three levels look like the same series.
4. Describe the edit instead of doing it
In AI Mode, you can give the AI Assistant the whole brief at once. For example:
"Build the beginner version. Use only the events labeled easier, in workout order. Add a 30-second countdown to each one and a 30-second rest card between them. Label each exercise by name, add a muscle diagram to each one, show a preview of the next exercise, and add my branded intro and outro."
In Plan Mode, the assistant drafts a step-by-step plan first, with any assumptions and questions. You fix what's wrong, then run it. A plan drafted once and run costs 30 AI Credits. Every plan, including the free one, comes with a monthly credit allowance. See pricing for the numbers.
Then open the advanced project and send the same brief with "harder", 45 seconds of work and 15 seconds of rest.
Every change can be undone, and you can switch to Manual Mode at any time to fix something by hand on the timeline. The Preview tool adds the small corner window, so you can show the easier version inside the standard video too.
5. Make the Shorts from the same footage
Start a new project with a vertical 9:16 canvas. Auto reframe follows you as you move. For floor exercises, Fit keeps your whole body in view instead of cropping your hands or feet.
6. Publish each level where it belongs
Generated videos can go straight to Social Media Posts for YouTube, Instagram, TikTok and Facebook. Each platform gets its own title and caption, which AI Enhance can draft from the video, and you can publish now or schedule for later. Our per-platform posting guide covers what each platform rewards.
What it won't do for you
- It won't plan your variations. The ladder is your coaching decision.
- It won't film anything. The easier and harder versions have to be in the footage.
- You still review every edit before it goes out.
- The overlays suit interval and strength formats like HIIT, dumbbell and walking workouts best. Breath-led yoga and Pilates rely more on your voice than on labels and timers.
Try it on your next workout
The free plan includes 30 minutes of uploads, 15 minutes of finished video and 200 AI Credits a month. That's enough to test the whole workflow on one short workout: upload it, label the levels, and build a beginner version. No card needed.
Start free with ActiveSnap and build your first level-specific video.
Follow-along workout variations checklist
Before you film your next workout:
- Pick one easier and one harder version of every exercise.
- Change only one thing per step (impact, range, support, speed, load or stability).
- Set work and rest times for each level.
- Film the standard workout, then a clip of every variation, in the same setup.
- Say the exercise name and level at the start of each clip.
Before you publish:
- Label every segment with its exercise and level.
- Build the beginner and advanced videos from those labels.
- Show the level, exercise name, timer and next exercise on screen.
- Put "beginner" or "advanced" in the title where it fits.
- Link all three levels to each other with playlists, descriptions and end screens.
- Cut a three-level Short for at least one exercise.
Follow-along workout variations let one filming session serve beginners, regular viewers and advanced viewers. Film each move at three levels, label the footage once, and build a separate video for each level from those labels.
If you'd rather not build three timelines by hand, try ActiveSnap free. You label the levels once, and the AI Assistant builds each version from a single brief.
Exercise guidance in this post is general information, not medical advice. Everyone's starting point is different, and results vary. Viewers with injuries or health conditions should check with a professional before starting a new program.